Official Luthiers Forum!
http://www-.luthiersforum.com/forum/

Dish Sanding Braces Tip (Pics)
http://www-.luthiersforum.com/forum/viewtopic.php?f=10102&t=9782
Page 1 of 2

Author:  Serge Poirier [ Mon Dec 11, 2006 3:47 pm ]
Post subject: 

Great idea Hesh, thanks!

Author:  Alain Desforges [ Mon Dec 11, 2006 4:41 pm ]
Post subject: 

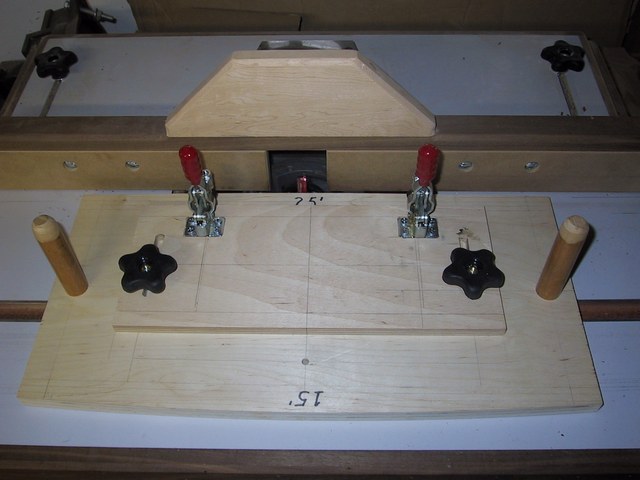
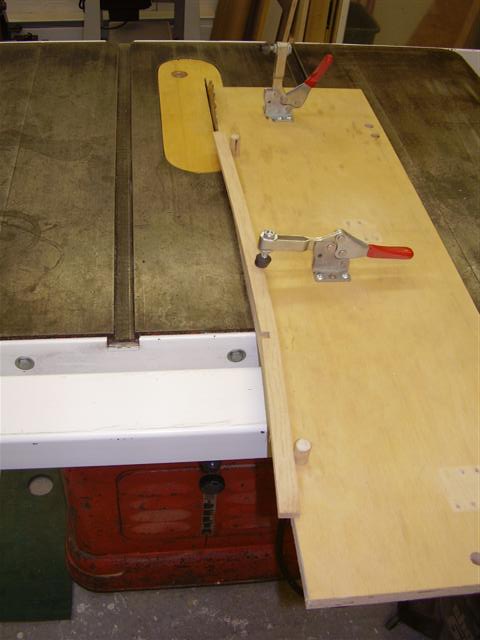
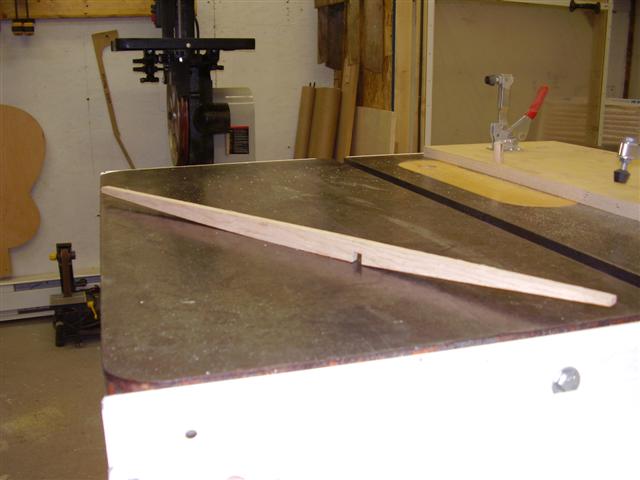
I too found that the flex was a problem. I took some thin maple stock and made a template for 15' and another for 25' radii.

When it comes time to shape the brace, I simply mark the brace to the correct radius using the template and then I take it to my bench top sander removing the extra material.

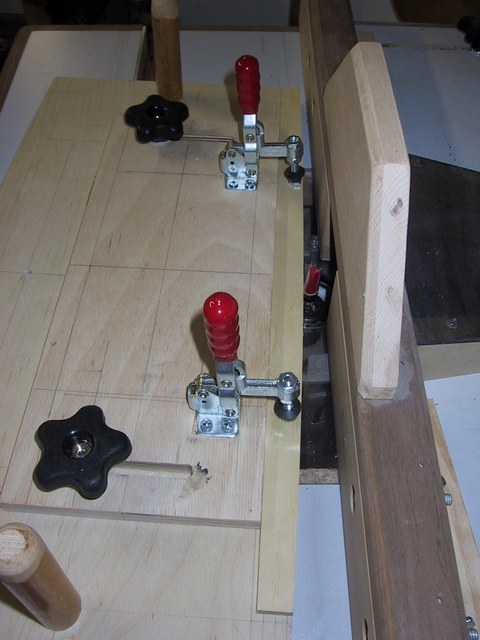
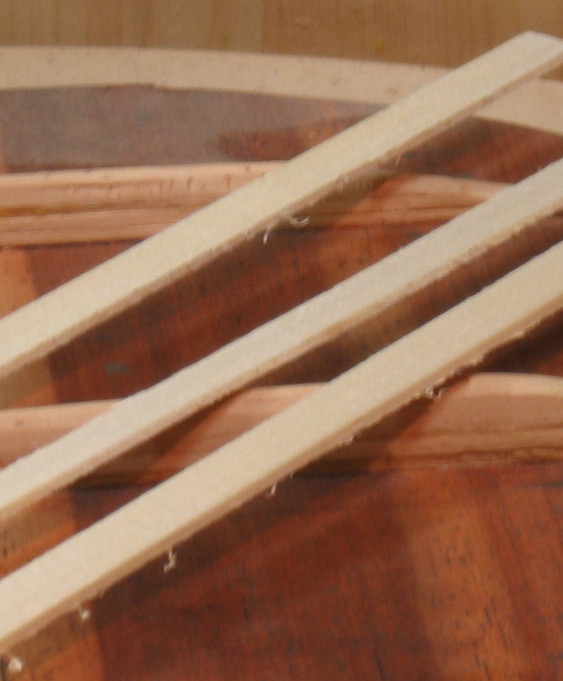
Then I'll finish it off in the sanding dish. I found this method cut down the sanding/time by a significant amount. I then check the accuracy and fit by sitting the brace in the 'gluing' bowl. I don't stop until it's 'air tight'...

What you listening to?

Author:  MSpencer [ Mon Dec 11, 2006 5:12 pm ]
Post subject: 

Great idea Heshmiester!

To add to your thought...........

When I cut brace wood on the table saw, I cut all to my height and width specifications for the top and backs. I mask tape a group of say 3-4 depending upon the thickness and do them at the same time. I also have found that if I hold and pivot one end and then move the other end back and forth or up and down it goes faster than back and forth or longwise across the dish. I guess a better way to explain if that was not understood is how the StewMac Kit side contouring little jig works, you hold one end and work the other along the kerf and side edge to get the proper radius. I find when I get the ends of the braces at the proper angle then going back and forth requires very little down pressure to finish.

Mike

Author:  Rod True [ Mon Dec 11, 2006 5:34 pm ]
Post subject: 

So are you sanding the entire radius into the brace Hesh?

From flat on the bottom to radiused?

This sure seams like a lot of work my friend. I know you don't like to build jigs, so why don't you do yourself a favour and get one of Tracy's fine built radius jig and use your bench top belt sander or just a plane?


Check out the video instructions too. Luthiersuppliers

No disrespect bud. I too have done the braces all by hand, just found a better and faster way is all.

If your pre-radiusing and just touching up, ignore my comments my friend.Rod True39063.0666666667

Author:  Colin S [ Tue Dec 12, 2006 1:46 am ]
Post subject: 

Some years ago I made this simple jig up to radius my braces. It will handle anything up to 25mm thick. I just traced the radius I wanted on the edge rough cut it on the bandsaw then sanded to exact profile in the dish. This has the advantage that the radius on the jig, and on your braces matches the radius of your dish rather than a generic available 15/25 jig. I did one side 25' and the other 15'. The clamps were bolted on, they have to be unbolted and turned for the other radius, as a 'temporary' method. I must get round to a 'permanent' fix sometime .

The radius is cut on the table router then the braces are just touched up in the radius dish. I usually radius enough for a couple of guitars at a time.


ColinColin S39063.4090162037

Author:  Rod True [ Tue Dec 12, 2006 1:49 am ]
Post subject: 

I thought you had one Hesh but didn't want to assume.

Just ignore me than, cause you got it goin' on bud.

Nice set of mahogany too, and can we see that rosette up close please

Author:  alambert [ Tue Dec 12, 2006 2:30 am ]
Post subject: 

I hate to be really dumb here... but I havnt gotten to braces yet in my reading. By radius the brace to you mean but curve/bevel (radius!!) on the flat part that is glue to the top? why wouldn't you want it to be flat? To make the top curved slightly?


Author:  Colin S [ Tue Dec 12, 2006 2:57 am ]
Post subject: 

[QUOTE=alambert] I hate to be really dumb here... but I havnt gotten to braces yet in my reading. By radius the brace to you mean but curve/bevel (radius!!) on the flat part that is glue to the top? why wouldn't you want it to be flat? To make the top curved slightly?

[/QUOTE]

Yes, the part of the brace that glues to the top is shaped with the same radius that you want the top to end up. Then you glue the (convex)brace to the top in the (concave)radius dish. The top then takes on the radius of the braces. Same for the back. The most common radius is 15' for the back and 25' for the top but this varies with the builder.

See here, with the top in a radiussed dish, and the braces shaped to the same radius, when the top has the braces glued on it ends up with that radius.


ColinColin S39063.4688078704

Author:  alambert [ Tue Dec 12, 2006 3:29 am ]
Post subject: 

wow. Sounds... complicated. So where do I get a dish? or do I have to make that too?alambert39063.4796875

Author:  Mark Tripp [ Tue Dec 12, 2006 3:43 am ]
Post subject: 

You can certainly make one, but many of our OLF sponsers carry them.

-Mark

Author:  MSpencer [ Tue Dec 12, 2006 4:52 am ]
Post subject: 

Hesh,

Yes, I hold one side, not hard and fast but use it as a pivot and sweep the other. I also pre-cut my braces using a template and scroll saw.

Mike

Author:  JJ Donohue [ Tue Dec 12, 2006 5:03 am ]
Post subject: 

Thanks to Bob Cefalu's jig that he listed in the "Jigs & Techniques" section, I was able to produce the jig pictured below. Before he donned his cape and became the "Zootman", Bob was an excellent guitarmaker and a master woodworker. You should see the fine furniture he has built!

The first pic shows the jig designed for a router table. It is capable of milling both 15' and 25' radii. I use a pattern bit...the bearing rides on the radius portion of the jig and the cutters slice the brace to conform to the radius. You need to carefully climb cut first to prevent tearout.


The second pic shows it in action.


Once the brace comes off the jig I take a few swipes on the sanding dish to complete the spherical radius profile. Total time for each brace...under 2 minutes.

Author:  Rod True [ Tue Dec 12, 2006 5:18 am ]
Post subject: 

Since we're showing off jigs

Here's mine, based on the same idea as Tracy's and Sylvan's, I use the mitre slot on the table saw with a board to hold the brace. Bend the brace and saw away. A couple of swipes on the dish (e'tout JJ) and it's ready to glue. Quick and easy. I also use this jig for cutting the taper on my fretboards, just pull the 1/2" dowels and it's ready.

This is a scrap piece for demo purposes.


Rod True39063.5563541667

Author:  Rod True [ Tue Dec 12, 2006 5:21 am ]
Post subject: 

Oh and that's a great looking rosette and top Hesh. She's going to be another beauty.

Author:  charlie [ Tue Dec 12, 2006 2:03 pm ]
Post subject: 

Hesh, I recently made two dished sanding boards but don't have any sand paper on them yet. Where did you get the abrasive sheet and how did you attach it to your dished board? What grit do you use?

Charlie

Author:  Greg [ Tue Dec 12, 2006 3:16 pm ]
Post subject: 

I like to use"leaf spring" braces. I rip the brace wood into strips .090 then run through my router table set up with a 3/16" spiral bit against a fence to plane the strips to 0.06" and smooth. Then use Go-bar to set braces on top or back plate pressing into the concave dish. the leaf springs are really easy to use and are laminated into a curve matching the work dish. So simple I can do it. See pic.

Author:  Greg [ Tue Dec 12, 2006 4:28 pm ]
Post subject: 

Hesh, The strips line up as though quarter sawn. In fact my brace wood is quarter sawn. It is a bit fiddly to get the strips but I like they way they laminate. the flat strips bend and as each is layered the glue lets the leaves slide and conform to the layer below. I have used strips from .060 to about 0.10. The lattter takes 3 to make just shy of 3/8". The idea is not mine. I stole the concept from Fred Carlson's talk on building stunning harp sympatars of extrordinary workmanship.

Author:  Rod True [ Tue Dec 12, 2006 6:17 pm ]
Post subject: 

Charlie, I see that you also asked about attaching the sandpaper to the dish. You can pick up 3m spray adheasive at any hardware store or big box hardware store for about $10 a can. It will last you a long time, you only need a thin coat and the paper will stick very very well.


and having a roller like this one will help get the paper down good a tight.


Page 1 of 2 All times are UTC - 5 hours
Powered by phpBB® Forum Software © phpBB Group
http://www.phpbb.com/